Take Heart Anniversary

This autumn was overwhelmingly busy with the various knitting festivals I got to attend. After a quick break, I moved into knitting and making a few plans for this winter.  Many new projects have been on and off the needles which hopefully I can share in the new year. I still plan to recap my trips to Vancouver's Knit City and Rhinebeck's Wool and Sheep Festival with a few photos soon. One of my goals lately has been to stay active and social on Instagram. Two weeks ago I had a lot of fun doing an Instagram Take Over for Pom Pom Quarterly to kick off some special celebrations. I can't believe a full year has gone by since releasing Take Heart: A Transatlantic Knitting Journey. We're celebrating the first anniversary by hosting a Take Heart KAL which is happening now on Ravelry. Head over there to see the details on how to join. It's running till January 2nd, 2017 so there's still plenty of time to participate! 

I thought I'd share my photos from the Take Over on here as well. You can always find Pom Pom on Instagram at @pompommag and my personal account at @fiona_alice_. I am so pleased I could share a little bit of my home, Nova Scotia, with Pom Pom's followers. Thanks for lovely comments! 

Hello Pomcats! I'm Fiona Alice and welcome to Nova Scotia! I'll be taking over the Pom Pom Instagram feed this weekend as Pom Pom and I are getting ready to celebrate the first anniversary of my book Take Heart: A Transatlantic Knitting Journey, which was inspired by both the Canadian and British landscapes. Nova Scotia is known for its varying coastlines so here's one of my favourite places, Duncan's Cove. Make sure you join in with our Take Heart knit along and tag your posts #takeheartkal and stay tuned for more pics from me @fiona_alice_. 

Hi it's @fiona_alice_  again with my #takehearttakeover of the Pom Pom account this weekend. Be prepared to see a lot of grey over Pom Pom's Instagram feed this weekend; it's my favourite colour whether natural or dyed. Luckily there's a never ending supply of beautiful greys along this rugged coastline, and Nova Scotia's overcast and rainy grey days make the perfect excuse for staying indoors to knit.

If you have a copy of #PPQ18you might recognise this design. Here's Kaali from this year's autumn issue. I couldn't resist using more of Elisabeth Beverley's Plant Dyed Cashmere, grey of course. Plus a few golden threads by Temaricious to match Nova Scotia's late autumn palette. The temperature is starting to drop here so the cozy cashmere is inviting to slip on cold hands. Stay tuned this weekend for posts from me @fiona_alice_ as I share more of my photos.

This is Fergus, my cat, knitting companion and biggest distraction. He constantly competes to be the softest grey item in my hands. To give him a run for his money I dug out some of @toft_uk Aran Alpaca which has been sitting in my stash for the past three years. Fergus loves alpaca and approves this yarn choice so I'll be casting on, just in time for the #takeheartkal. I feel like there is only one project this yarn is destined to become. 

Putting my @toft_uk Aran Alpaca to use and slowly working on #takehearthat. This pattern was originally launched 3 years ago in Issue 7, Pom Pom's Winter 2013 Issue. It's still one of my favourite patterns, and I love to see it knit up by others. I'm selfishly knitting this one for myself.

You can often find me knitting or with my laptop, here at Seven Bays Cafe in Halifax's North End. Thanks for letting me share a little piece of my knitting world with you this weekend. It's wild to think one whole year has gone by since releasing Take Heart: A Transatlantic Knitting Journey. I would not have been able to do this without your support. I can't wait to see where my next knitting journey will take me! Please keep sharing your projects with me, #takeheartkal - I love to see them. Signing off with much love, Fiona Alice.


Since Christmas is around the corner, Pom Pom put some very exciting knitting kits together. The Border Mill has graciously released a special yardage of their Alpaca Tweed for this. There's enough to make the Chester Basin hat and mitten set. Head over to the Pom Pom Shop to see the gorgeous colour combinations! I definitely wish I had more of this yarn in my stash. 

Photography: Pom Pom Quarterly 

Photography: Pom Pom Quarterly 

I was also lucky to be invited back as a guest on the Pomcast last week. You can listen to Sophie and I catch up and discuss what has happened since releasing Take Heart. It has been an amazing year that just flew by but I'm getting excited about new plans to come in 2017. Here's my newly finished Take Heart hat, the project that started this all and just in time for the snow! I love seeing the project photos that knitters choose to share, please continue! I'll have a little treat for my followers here on the blog this week, a little thank-you for your love and support. 

Lace Trim Tutorial for Lunenburg Harbour

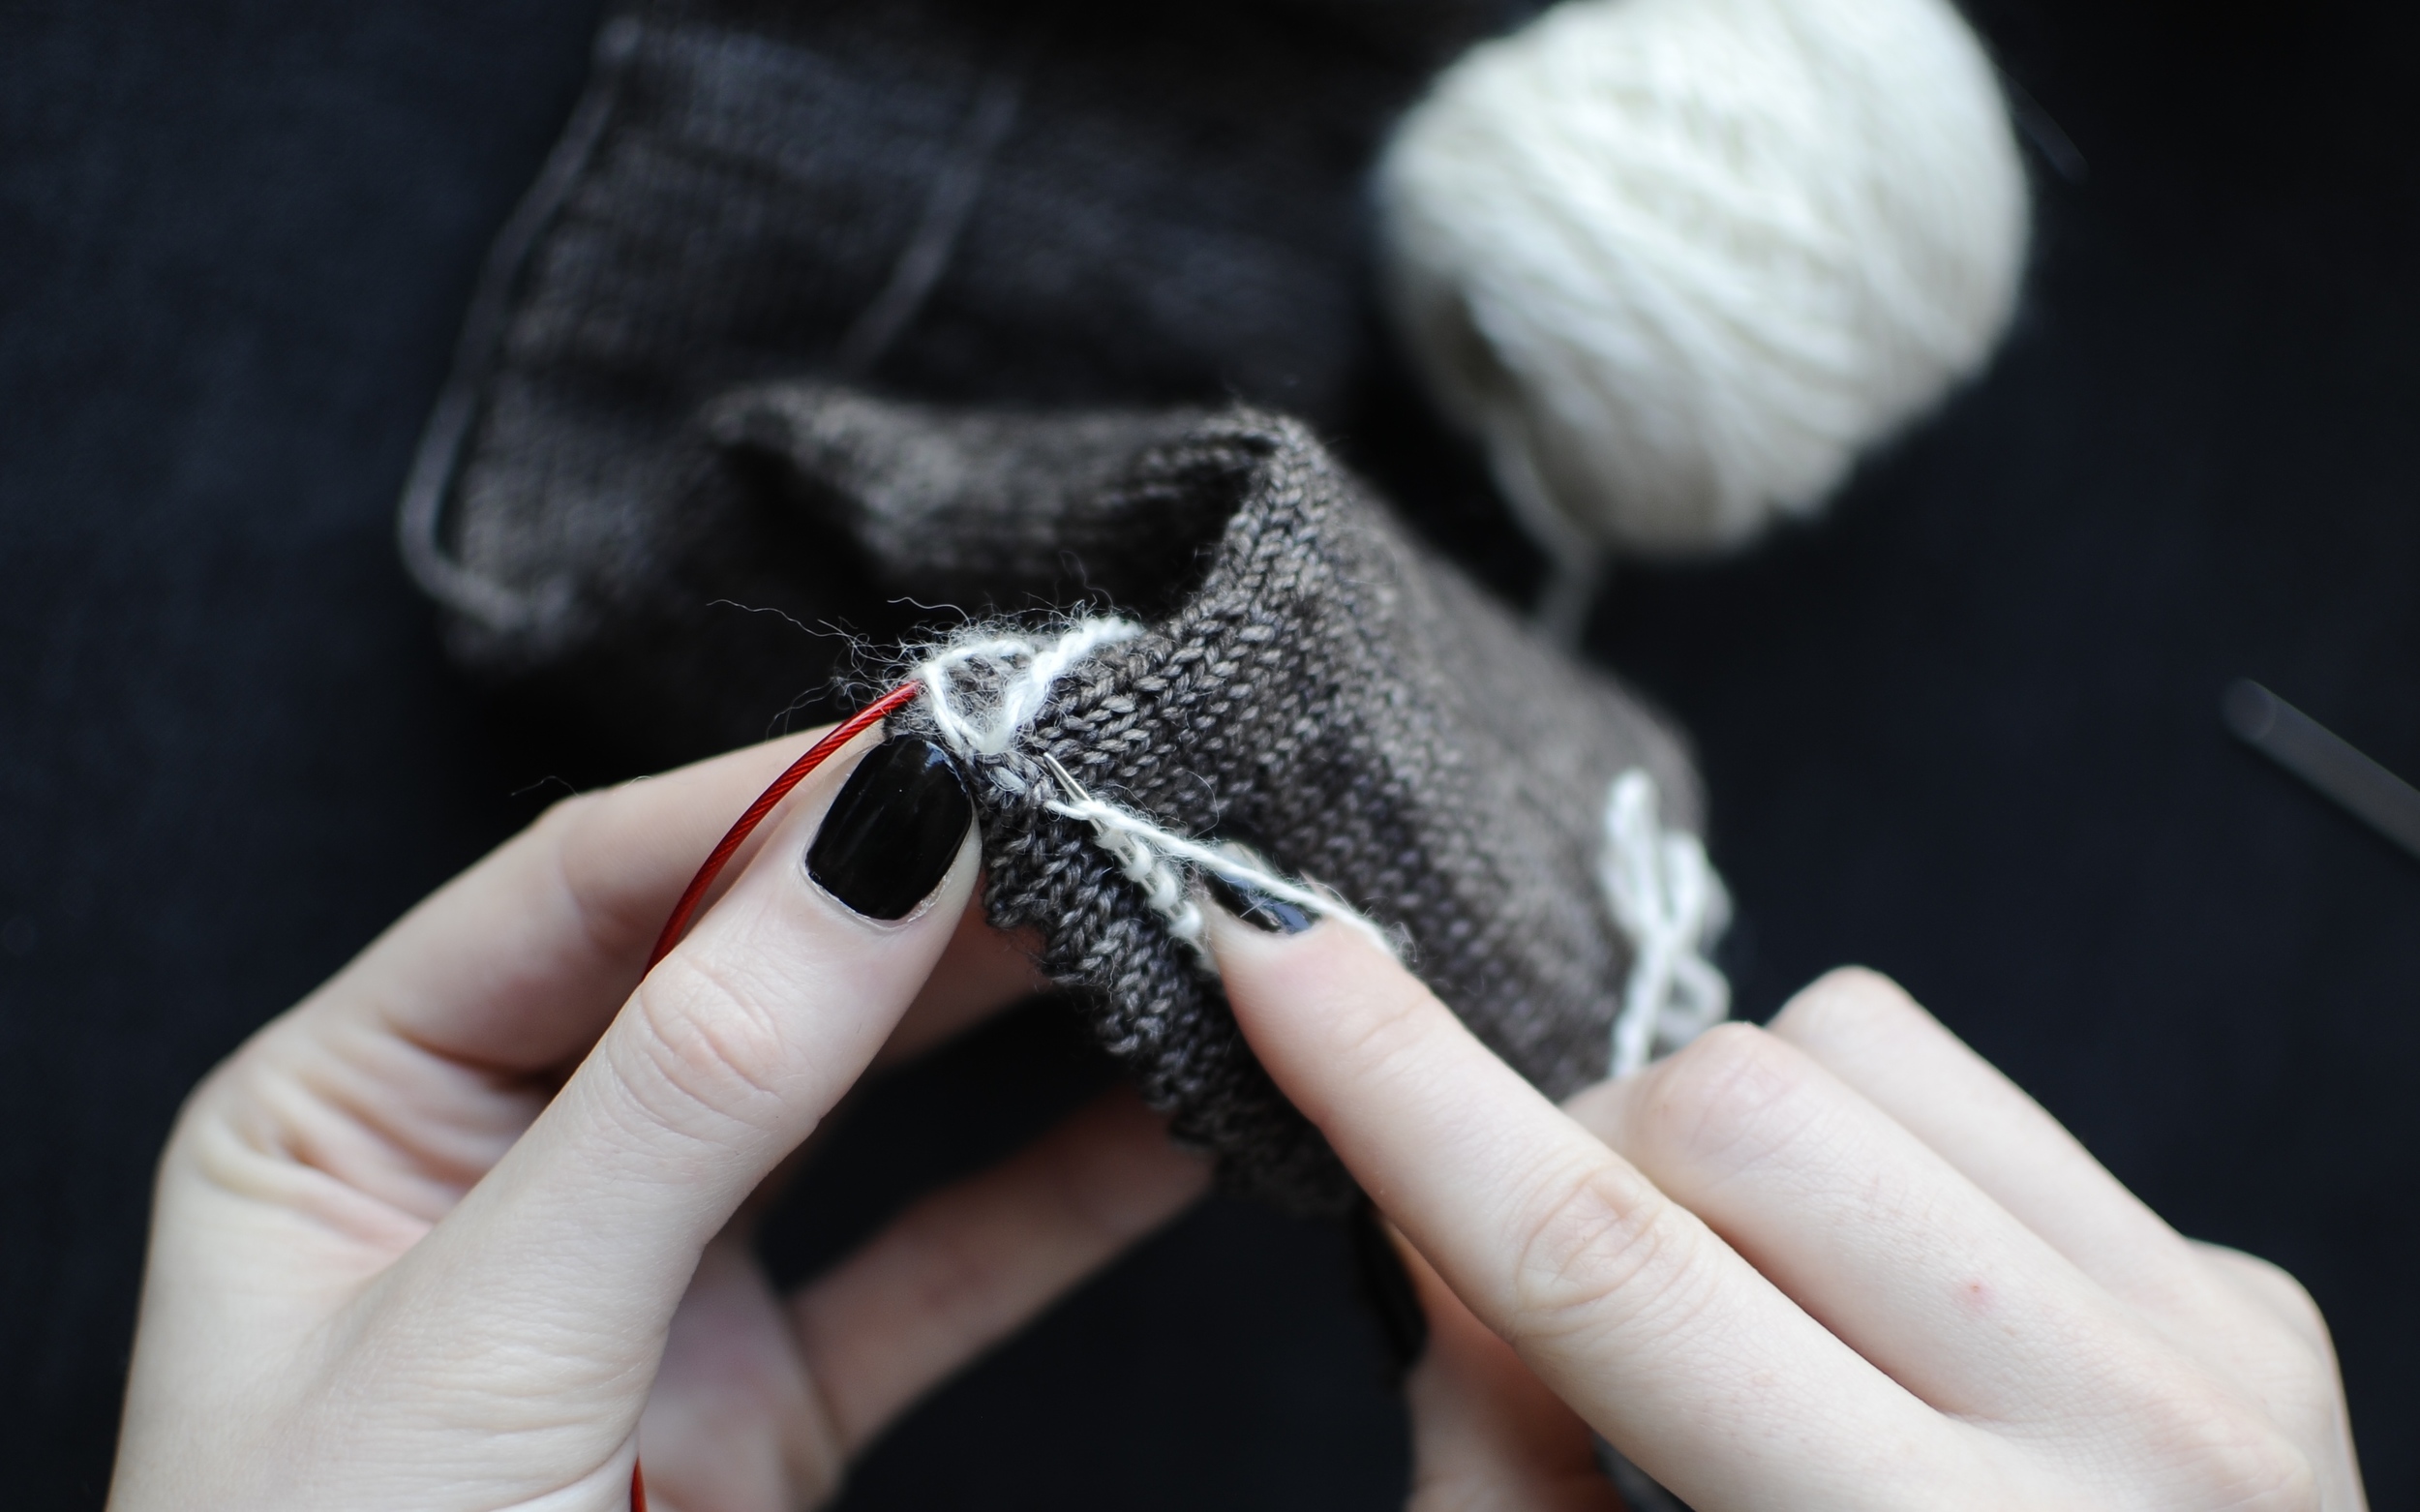
If you've already completed sewing down the picot trim then you're ready for this post where I'll be detailing how to pick up the stitches around the cuff of the sock to start the lace trim. You can find my post about the picot trim here. At this point, I still have the lace yarn (Yarn B) threaded around the circumference of the cuff. You'll need your knitting needles again. I'll be picking up the stitches with the same circular needle I used to knit this pair. You'll also need a darning needle and scissors. 

1. Start by giving the cuff a little stretch. This should make Yarn B fairly easy to see. 

1. Start by giving the cuff a little stretch. This should make Yarn B fairly easy to see. 

2. Start at the seam where you left Yarn B. Pick up the working yarn and begin to work in an anticlockwise direction. Insert the needle under Yarn B, as if to knit (in-between the stitches you used to sew down the picot hem). 

2. Start at the seam where you left Yarn B. Pick up the working yarn and begin to work in an anticlockwise direction. Insert the needle under Yarn B, as if to knit (in-between the stitches you used to sew down the picot hem). 

3. Wrap yarn around the knitting needle to knit that first stitch onto the needle. 

3. Wrap yarn around the knitting needle to knit that first stitch onto the needle. 

4. Insert knitting needle underneath Yarn B in the next section. Wrap yarn around needle again and knit that stitch. 

4. Insert knitting needle underneath Yarn B in the next section. Wrap yarn around needle again and knit that stitch. 

5. Continue to repeat Steps 3 - 4 to pick up all the stitches around the circumference of the cuff. 

5. Continue to repeat Steps 3 - 4 to pick up all the stitches around the circumference of the cuff. 

_3001430.JPG
6. Once you've worked all the way around, there should be 64 (72) stitches on your needles. 

6. Once you've worked all the way around, there should be 64 (72) stitches on your needles. 

7. Using the Backwards Loop Method, cast on 4 stitches onto Left Hand needle. This is the third errata in the pattern. It should read LH needle instead of RH needle.  

7. Using the Backwards Loop Method, cast on 4 stitches onto Left Hand needle. This is the third errata in the pattern. It should read LH needle instead of RH needle.  

8. Ignore 'turn work'. You should already be set up to start  Row 1 of the lace repeat.

8. Ignore 'turn work'. You should already be set up to start  Row 1 of the lace repeat.

9. Now begin Row 1 of lace repeat. 

9. Now begin Row 1 of lace repeat. 

10. Once you finish Row 1, turn work. 

10. Once you finish Row 1, turn work. 

12. Now you'll be ready to start Row 2 of lace repeat. 

12. Now you'll be ready to start Row 2 of lace repeat. 

13. Continue to work Rows 1 - 4 until there is one cuff stitch remaining. Work Rows 1 - 3 once more. 

13. Continue to work Rows 1 - 4 until there is one cuff stitch remaining. Work Rows 1 - 3 once more. 

14. Cast off the remaining 6 stitches. 

14. Cast off the remaining 6 stitches. 

15. With the end of Yarn B, sew up the beginning and end of the lace trim for a nearly seamless finish. 

15. With the end of Yarn B, sew up the beginning and end of the lace trim for a nearly seamless finish. 

16. Finish by weaving in the rest of your ends. 

16. Finish by weaving in the rest of your ends. 

17. Turn sock right side out again and voila! You should have a double layer of picot and lace trim.

17. Turn sock right side out again and voila! You should have a double layer of picot and lace trim.

Now the lace trim should be finished! Move on to completing your sock with an after-thought heel. Repeat pattern for second sock. If desired, once after washing the socks, the lace trim can be slightly stretched out and pinned to block as the sock dries. 

Once again the erratas for the rest of this sock can be found in my first tutorial here, or on the Pom Pom's Errata page. Also many thanks to Otto Django Masters for the photography help! 

Picot Hem Tutorial for Lunenburg Harbour

When I traveled to Iceland a few weeks ago, I was in need of a small portable project to take with me and what's more perfect than a pair of socks on the go. It was an excuse to reknit the Lunenburg Harbour socks from my book, Take Heart. They were originally one of the first pieces I started to design and knit for the book. It was a pleasure to revisit them again. In doing so, I unfortunately regret to mention that I did come across a few mistakes in this pattern. 

I will post the erratas here. You can also find them on Pom Pom's Errata page. The first one is in the very beginning of the Foot Section.

Foot: Round 1: K10 (12),  [sl1, k2] 5 times, k8 (k10), k to end.

Knit to end, instead of purl to end, only for this first round. This insures a seamless joining of the two contrasting colours.

Leg: The round numbering is out of sync after Round 16 and currently reads from Round 11-39. All pattern text is correct but the rounds should be numbered from Round 17-49.

Cuff: Using the backwards loop method, cast 4 sts onto LH needle. Ignore turn work. 

This should be Leaf Hand needle instead of RH. I'll revisit this again in the Lace Trim Tutorial

The rest of this post is a tutorial on how to finish your sock with the picot trim. How to pick up for the lace trim will be in this second blog post. You'll need the lace yarn (Yarn B), a darning needle and scissors. So far, I have finished knitting the sock (excluding the heel). The last round of stitches is still on my knitting needles.

This pattern does call for double pointed needles. However, this time I knit this pair on a long circular needle using the Magic Loop Method. I used one 80 cm / 2mm Chiaogoo circular needle. I prefer to do one sock at a time. I also did knit the majority of this pair inside out. I cast on and did the toe as directed in the book.

I added a short-row to change direction once I joined my main colour (Yarn A). This allows me to kint my sock inside out. Follow the directions but knit instead of purl, purl instead of knit and slip stitches with yarn in front instead of yarn in back. I used some yarn I already had in my stash (shocking I know). I had plenty left over from Toft's Alpaca Fine Sock yarn from the original pair. You'll also recognize The Uncommon Thread's BFL, colour Attic Room, used in the Pennard Castle leg warmers from the book. 

1. Break Yarn A and leave a long tail, approximately three times the circumference of your sock, for sewing down the picot hem. Thread the darning needle with Yarn B. Slowly thread the stitches from your needle onto the darning needle and …

1. Break Yarn A and leave a long tail, approximately three times the circumference of your sock, for sewing down the picot hem. Thread the darning needle with Yarn B. Slowly thread the stitches from your needle onto the darning needle and Yarn B. Work in a clockwise direction. 

2. Continue to transfer all of the stitches and remove your knitting needles. Unthread darning needle and leave Yarn B still attached and off to the side. Yarn B will be used to knit the lace trim later.

2. Continue to transfer all of the stitches and remove your knitting needles. Unthread darning needle and leave Yarn B still attached and off to the side. Yarn B will be used to knit the lace trim later.

3. Fold down hem to see the picot edging. Thread darning needle with your main yarn (Yarn A). 

3. Fold down hem to see the picot edging. Thread darning needle with your main yarn (Yarn A). 

4. To sew the hem down, start by inserting the needle into the first live stitch, as if to purl. Draw yarn through but do not pull it too snug. If the hem is sewn down too tightly, the cuff of the sock will be difficult to pull on. 

4. To sew the hem down, start by inserting the needle into the first live stitch, as if to purl. Draw yarn through but do not pull it too snug. If the hem is sewn down too tightly, the cuff of the sock will be difficult to pull on. 

5. Lift hem up to find the corresponding stitch directly below. Insert the darning needle into the first purl bump several rows below, from top to bottom. 

5. Lift hem up to find the corresponding stitch directly below. Insert the darning needle into the first purl bump several rows below, from top to bottom. 

6. Pull the yarn through to close up the hem.

6. Pull the yarn through to close up the hem.

7. Insert the darning needle into the next live stitch, always as if to purl. 

7. Insert the darning needle into the next live stitch, always as if to purl. 

8. Insert the darning needle, top to bottom, into the next purl bump. 

8. Insert the darning needle, top to bottom, into the next purl bump. 

9. Continue to repeat Steps 7 & 8, until all the the stitches have been worked. 

9. Continue to repeat Steps 7 & 8, until all the the stitches have been worked. 

10. Check every once in a while to make sure there is still some stretch in the cuff. 

10. Check every once in a while to make sure there is still some stretch in the cuff. 

11. Once the hem is sewn down completely, weave in Yarn A and trim excess yarn. 

11. Once the hem is sewn down completely, weave in Yarn A and trim excess yarn. 

The picot hem in now complete! Next step will be to pick up for the lace trim. You can find that tutorial here. Your sock is almost done! 

Many thanks to my talented housemate, Otto Django Masters, for helping with the photography. Check out his website

Caswell Bay, Ketch Harbour, Martinique Beach

Over this recent holiday break, I indulged in some long awaited personal knitting. I only just spent the summer knitting these items as samples for Take Heart. However, since I had some time, I decided on these pieces because I eagerly wanted them for my own winter wardrobe. 

mitts5.JPG

This first design to be finished was the Caswell Bay Fingerless Mitts. I chose Eden Cottage's Bowland DK which is 100% Blue Faced Leicester. I recently had the opportunity to knit with other BFL blends for the book and enjoyed each one immensely. This particular colour has been staring at me from the shelves at Loop for a while now. I find Bowland knits up as a light DK, so it was a perfect substitute for Handmaiden's Lady Godiva. I may just have to pick up another skein for the hat to complete this set. 

mitts4.JPG
mitts3 copy.JPG
shawl1.JPG

I've always wanted to use Orkney Angora's St Magnus DK that we stock at Loop. Plus I have been craving a black shawl for awhile now and I felt this angora blend would be perfect since it is warm and very lightweight. It's been an accessory I've had a hard time removing since I started to wear it. I picked the colour, London's Dark Evening, for Ketch Harbour. London's Dark Evening is one of the seven exclusive colours only available at Loop. I want to start picking very special yarns as I'm using them to eventually remind me of my time in London once I leave. 

Last but not least, is Martinique Beach. I'll use anything as an excuse to knit with any colour grey by The Uncommon Thread. Olive Leaf, Toast and Grit are the three greys used, plus I chose Tea Smoked to partner with them. I love the difference in the look you get by using a much more subtle colour palette. For my Christmas knitting projects, I picked out these four skeins of Uncommon's Lush Worsted. They came with me to Sicily for the holidays. I was able to cast on over Christmas surrounded by some of the best food and wine I've ever had. 

I've also been enjoying my new stitch markers, sent to me by my mom at Christmas. Winter is coming! They are by Winemakerssister on Etsy. My antler necklace is by Damara Mossman from Lunenburg, NS. It was a treat I picked up from a local Halifax shop, Big Pony, when I was home visiting in the fall!

Photos by The Line Girl, Leanza May.